The Engineering Truth: Why Specialized American RV Maintenance is Vital
American RVs are complex machines that require a level of care far beyond a simple oil change. Most importantly, this should be performed by specialists who understand the unique systems found in these vehicles. Many owners try to take the easy option by visiting a local lorry workshop. While HGV engineers are highly qualified with trucks, an American motorhome is a different beast entirely. Consequently, a lorry mechanic might fix your Cummins engine but be completely stumped by your gas-fired fridge or slide-out hydraulics.
At American Motorhome Services (AMS), we take immense pride in our extensive knowledge of these vehicles. We believe you should never pay a mechanic to “learn” on your rig. Therefore, we use a time-evolved service sheets that tracks recurring industry issues. If a problem appears more than once, we monitor it; if it becomes frequent, it becomes a mandatory part of our service. This proactive approach ensures your journey remains trouble-free and safe.
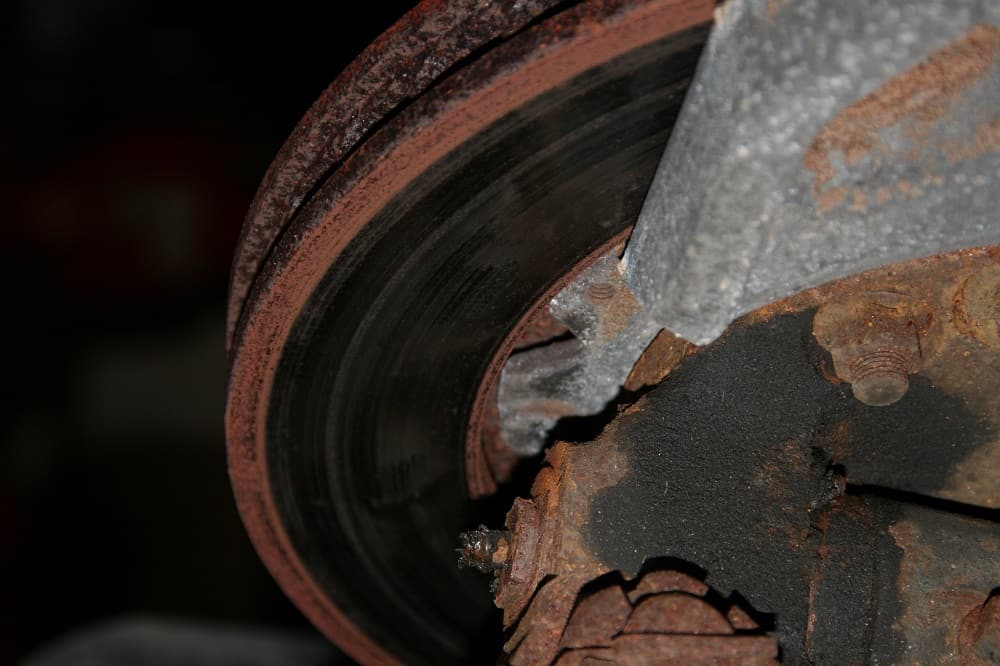
The discoloured brake disc.
The Hidden Dangers of the “Low Mileage” Myth
In the UK, we often see American coaches with surprisingly low mileage. A ten-year-old vehicle with only 17,000 miles on the clock might look like a bargain. However, from a mechanical perspective, a motorhome that sits still is a motorhome that is deteriorating. The British climate is notoriously damp, and moisture in the air is a silent killer for stationary brake systems and tyres.
The Mystery of the Blue-Tinged Brake Disc
During an AMS service, we always remove the road wheels. This is the only way to properly inspect the friction material. If we spot a “blue tinge” on the brake disc, it alerts us that the brakes have been overheating. Subsequently, we check the water content of the brake fluid.
If the moisture content is above 2.5%, the fluid requires an immediate change. Moisture lowers the boiling point of the fluid, which can lead to catastrophic brake fade on long descents. Without removing the wheel, an inexperienced person would miss this manifesting problem entirely.
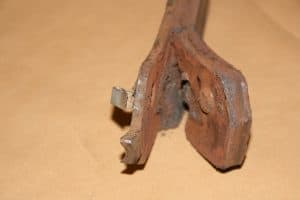
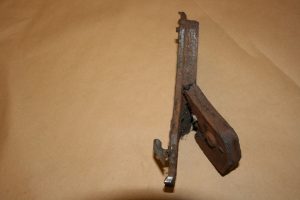
Corrosion and Adhesive Failure
When a vehicle sits for long periods, moisture attacks the brake pad material. This causes the metal backing to corrode. Eventually, the adhesive bond between the backing plate and the pad fails, causing the friction material to crumble away.
In drum brakes, which are common on rear-engine diesel pushers, corrosion builds up under the brake shoe. This “rust jacking” forces the shoe upwards, putting immense pressure on the rivets. If this goes undetected, the lining can crack and break off. Another issue is the build-up of brake dust in the rivet holes, which eventually compresses and lowers braking efficiency.
Advanced Air Brake Maintenance and Desiccant Care
American RVs equipped with air brakes utilize a device known as an air dryer. On top of this unit sits a desiccant canister, which looks similar to a large oil filter. This canister requires replacement every few years to keep the system clean.
The canister houses desiccant beads in a textile bag. Over time, this bag deteriorates. If the beads escape, they enter the air brake system and wreak havoc on delicate air valves. Furthermore, once the desiccant is saturated, it cannot absorb any more moisture. In a cold UK winter, that moisture can freeze inside your lines, locking your brakes and endangering your family.
Navigating the UK MOT for American Rigs
Once your American motorhome reaches three years of age, it requires a Class 4 MOT. This is the same test used for family cars, but the stakes are much higher for a 7-ton coach. Recent changes to VOSA requirements mean that inspectors now look closely at ball joint dust covers.
The Sealed vs. Greaseable Debate
Many modern RV chassis use sealed ball joints. Once the rubber dust cover is damaged, water enters and dilutes the internal lubrication. This accelerates wear immediately. Conversely, older versions used greaseable ball joints.
When we service a greaseable joint, the act of pumping in fresh grease forces out any trapped water. However, if a sealed joint is worn, we recommend a full replacement. It is never worth the labour cost to simply replace a rubber boot on a joint that has already been exposed to road salt and grit.
Electrical Safety: Avoiding the “House Wiring” Trap
We frequently encounter 230-volt electrical problems that are down to a lack of specialist knowledge. Some of this work is completed by domestic electricians who are out of their comfort zone. A common problem is the use of incorrect wire gauges, especially when wiring up transformers.
The Transformer Formula for Safety
Domestic electricians often use the same gauge wire for the input and output of a transformer. This is a violation of basic electrical engineering rules. If you halve the voltage, you must double the amperage.
Therefore, the cable exiting the transformer needs to be twice as thick to safely handle the increased current. We once traced a burning smell in our workshop to a transformer that was melting because the exit cable was too thin. Specialized American RV Maintenance ensures your electrical system is safe, fused correctly, and built for the vibrations of the road.
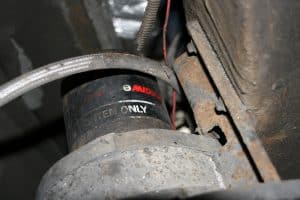 In the picture, you can see that the desiccant filter has not been changed for some time.
Damp Testing and the “Forgotten” Roof Seal
Damp is the single biggest threat to the structural integrity of a motorhome in the UK. We have seen owners skip services for three years because they “only used the RV twice.” This is a dangerous gamble.
In one real-world case, a TV aerial had been struck by a branch, damaging the seal. Because the vehicle wasn’t inspected annually, water leaked under the rubber membrane for years. By the time we saw it, the wood was rotten, and the damage was severe enough to warrant replacing the roof timber. A simple annual roof re-seal would have prevented this significant expense.
Optimising Your Air Conditioning for Safety and Visibility
Many owners think air conditioning is only for summer comfort. In an American RV with a massive panoramic windscreen, the A/C is actually a vital safety feature. Its primary job is to remove moisture from the cabin air.
On a rainy day in the UK, your windscreen will mist up in seconds. The A/C system is automatically activated when you direct the heater to the screen. If your gas pressure is low due to a leaking compressor seal, you won’t be able to clear that screen. At AMS, we check these pressures during every service to ensure you have a clear view of the road ahead.
Battery Health and the “75% Charge” Problem
Checking the batteries is a core part of our service. We check water levels and inspect for distortion before topping them up with distilled water. However, the biggest problem is often the battery charger itself.
Some original American chargers only output 13.6 volts. While this keeps the lights on, it only charges the battery to about 75% of its capacity. This leads to sulfation, which permanently reduces the battery’s life. To reach 100% charge, your system should be pushing closer to 14.4 volts. We test these levels to ensure you aren’t left stranded without power.
Tyre Ageing: The Silent Danger of Low Mileage
On a motorhome, tyres rarely wear out their tread; they “age out” instead. We check the four-digit date stamp on every sidewall during our inspections. If you see “0417,” it means the tyre was made in the 4th week of 2017. Tyres should ideally be replaced at 10 years old.
The UV and Oxidation Factor
Tyres contain anti-oxidising chemicals that are only released when the tyre is in motion. If your RV sits in storage, the rubber dries out and develops sidewall cracks. This is brought about when ultraviolet light from the sun oxidises the rubber. Badly cracked tyres are usually light grey in colour. Owners often assume plenty of tread means the tyre is safe, but an aged tyre is a serious safety risk for all road users.
The Truth About Tyre Pressures and Data Plates
The data plate inside your American coach was written by the manufacturer using original specifications. These recommendations often do not apply to the tyres you have fitted today. Furthermore, Americans do not have the roundabouts or deep potholes that we suffer in the UK.
If you are running the 70 psi recommended on a 1996 data plate but have modern 225/70/19.5 tyres fitted, you are likely running them dangerously under-inflated. Budget tyres often require much higher pressures (up to 120 psi) to carry the same load as a premium Michelin. At AMS, we calculate your pressures based on the maximum load rating on the sidewall and your specific axle weights.
Why the AMS Service Exceeds MOT Standards
An MOT is merely a snapshot of your vehicle’s condition on one specific day. At AMS, our goal is to ensure the vehicle remains safe until the following year. We check steering ball joints, brake pipes, and kingpins with a view toward long-term reliability.
We also grease every single nipple on the chassis—something many MOT stations simply don’t have time for. By combining your MOT with an AMS service, you get the benefit of a professional engineering inspection that looks deep into the “health” of your rig. Proper American RV Maintenance is about more than just passing a test; it is about protecting your investment and your family.
If you want your American RV to provide years of trouble-free adventure, don’t settle for a “lorry service.” Give your coach the specialist care it deserves. For all your service and MOT requirements, please call American Motorhome Services (AMS) on 01604 861999. Let’s keep that rig running as smoothly as the day it left the factory!
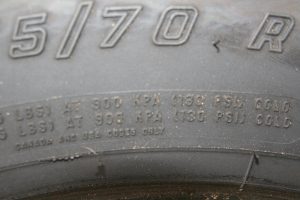 The tyre pressure is stamped on the sidewall of the tyre. Then we examine the maximum load rating of the tyre, ensuring that the load rating is sufficient for the motorhome’s gross axle weight rating (GAWR).
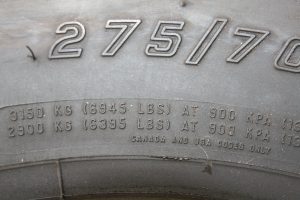 The top number, 3150 kg, relates to a single tyre (front), and 2900 kg relates to dual tyres (rear).
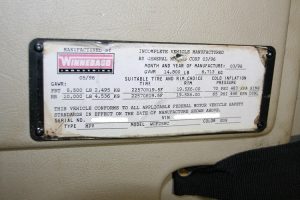 On this data plate, we can see that the front gross axle weight rating is 2,495 kg, and the rear is 4,563 kg. On an AMS service, we ensure that all tyres fitted are capable of carrying the vehicle’s weight.
A safety warning regarding the data sheets: Some of the American RV motorhome data sheets are out of date.
 In the above image, the tyre pressures are quoted as single (front) 70 psi and dual (rear) 65 psi. This plate relates to a motorhome built in 1996.